Tuesday, February 28, 2012

How to make filters for pet drinking fountains

I've had the Cat Mate Pet Fountain for almost a year now and I love it. My cat won't drink from anything else. It is much easier to keep clean than the PetMate Fresh Flow model it replaced. One of my favorite features is that the water goes through the filter before it goes through the pump. Ya think?

My least favorite feature is the filter itself. It's a blue plastic cartridge filled with carbon gravel and layers of polyester-type filter. It works great, but needs cleaned about once a week to keep the slime away. The main problem with the filter is that when you need a new one, you have to replace the entire plastic assembly! What an unnecessarily wasteful expense. 

I tried squeezing my leftover PetMate filters into the plastic case until I ran out of them. Then I Googled in vain for a filter hack. I found a few discontinued products people had tried, but that wasn't going to help me. 

At some point in my search I came across aquarium and pond filter supplies. It was worth a risk. These seemed to be the same basic materials, designed to keep water clean enough to keep fish alive: It ought to be good enough for my cat.

Amazingly, I hit the jackpot on my first trial! I ordered cut-to-fit polyester and carbon filter pads from Amazon.com, thinking I'd find a way to squeeze them into the leftover blue cartridge. The carbon sheet is actually much thicker and more rigid than I expected, and can be used without the plastic case! Because it's cut-to-fit, this should work for a wide variety of pet fountains.

How to make filters for pet drinking fountains

You will need: 
empty Cat Mate filter cartridge
rotary cutter and self-healing mat
straight edge
scissors 

Fold the polyester pad in half lengthwise, or as we teachers say, "hot dog" style. Use the empty cartridge to measure and mark a strip the width of the filter. Cut through both layers with your rotary cutter. Measure and mark the lengths, and cut.

Use a couple of the polyester pieces to measure a strip of the carbon fiber. This material is much thicker than the rotary cutter blade, so it didn't cut all the way through. I finished the job with my scissors. 

Layer one white pad on top of the black filter and place in the cartridge slot. It fits perfectly and holds itself in place. During my first weekly cleaning, I noticed the polyester pad was sagging a bit and there was a lot of black sand in the water. I decided to sandwich the charcoal with another layer of polyester and bind all three together with a rubber band.

The 18x30" polyester pad is much larger than the 10x18 carbon filter, so you'll end up with a lot more of the white pads. As the first layer of filter, this pad will pick up most of the gunk and need to be cleaned and replaced more frequently. 

The polyester pad is machine washable and can even be bleached if you then treat it with a dechlorinator. Most manufacturers recommend using vinegar to clean pet fountains and cycle through your pump. 

And there we have yet another amazing use for vinegar! Can I buy stock in the stuff?

Update: I noticed the filter was working so well, by the time it needed cleaning, the pump was actually struggling to find water. I think I'll take out the second layer of polyester after all. It'd be better to let a little gunk go through the pump than burn it up completely.

Monday, February 27, 2012

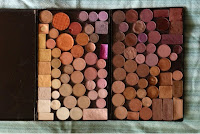
Customized magnetic makeup palettes

Z Palette Pro
I first read about the Z Palette in a magazine at a doctor's office. I love the idea of consolidating all my loose shadows and compacts into organized, uniformly sized, space saving palettes! Unfortunately, I was unable to find any local retailers in the Portland area and the clerks at Sephora and Ulta had never heard of it. If any locals know of anyplace that carries it, I'd love to know. I just couldn't spend $20-28 a piece (or more, with shipping) on something sight unseen.

My Contour & Blush Palette
One of the first things I learned during my medical leave was how to watch youtube videos. With a short attention span and laptop on the floor, I was finally a captive audience. So I watched every tutorial I could about DIY palettes and depotting shadows (I will not reinvent the wheel here with depotting instructions). I decided against using plastic CD or DVD cases, but had a hard time finding the right fit for me.

Eventually, I decided to purchase some 6x9" shadow and blush palettes from Coastal Scents and BH Cosmetics (they're identical and bigger than the empty palettes from Coastal Scents). Even if the powders are of questionable content from China, it seemed like a better bargain than buying empty palettes. It appeared possible to remove the shadows and plastic tray and replace them with a magnetic sticker, but the two helpful tutorials I found still left many questions unanswered, so I decided to write my very first tutorial:

How to magnetize and customize a Coastal Scents or BH Cosmetics palette

You will need:
pre-filled palette(s)
adhesive magnetic sheet(s)
knife
scissors
rubbing alcohol (the highest percent you can find)
heat embossing tool or hair dryer
baby wipes for clean-up
towels to protect your work surface
 
Additional optional supplies:
26mm metal tins and press pack from TKB Trading
3/4" adhesive craft magnets from Craft Supplies for Less
duck tape sheets for decorating available at Target, Jo-Ann's, etc.

The first thing you're going to do is poke through the flimsy plastic tray the tins are glued to. Use the knife to cut all around the perimeter of the palette and separate each shadow. Be careful not to nick or break your pressed powders, but if you do, you can re-press them later with the rubbing alcohol and a baby wipe. You can then use your scissors to trim around the shadows. This will give you openings to pour the rubbing alcohol into.

The tins are glued in two places, first into the plastic tray and then under each shadow to the palette below. The glue is strong, and if you try to just pry them out, you will break all your powders. Instead, pour rubbing alcohol into one of your openings and let it sit while you repeat the first step on your next palette. You may need to keep adding alcohol as it evaporates and tilt the tray to get to each spot of glue. If you're impatient for the glue to turn to goo, use a quick shot from your heat tool. Be careful not to warp the bottom of the palette!

After you've let it soak, use your knife or sturdy prying tool (I switched to a letter opener) to begin gently poking under the edges of the shadows. Some of them come out easily, and others become a yucky mess. It just depends on how much glue there is. Don't force it. Add more alcohol and keep prodding until you can pull out the shadow, the plastic tray, or bits of both. I will confess that the palettes I used for this tutorial took a lot longer to clean out than any of the palettes I had previously done. This is a great opportunity to listen to an audio book or podcast (I listened to one on C.S. Lewis).

broken shadows can be fixed!
When you have finally liberated the tins from the palette and as much as the plastic tray that comes with them, use your knife to scrape off all remaining plastic bits. It doesn't matter how scratched up the palette gets, but you don't want anything left in there that will cause bumps under your adhesive magnet. Use baby wipes and copious amounts of rubbing alcohol to clean all traces of glue from the palette and the bottoms of the shadows.

Next (or while you are waiting for the glue to dissolve) use the clear plastic protector that came in the palette to trace out the shape of your magnet. I cut mine just a little bit smaller, and angled off the corners for a better fit. I purchased 9x12 sheets from Craft Supplies for Less. Each sheet will magnetize two palettes, with a bit left to stick to tins. I'm going to try another magnet from Jo-Ann's, I'll let you know how they compare.

When you are certain that the palette is clean and ready, it's time to stick in the magnet, smoothing as you go to avoid air bubbles.

Voila! You now have a custom magnetic palette. Steel tins will stick without any further preparation. You can super-glue thin magnets to the bottom of aluminum tins, or cut a thin piece of metal (I had some leftover from magnetizing e.l.f. palettes). Use a sharpie to label shadows you want to remember the name/brand of.


I did the math and found that although this method takes a lot of time, I spent $14 in materials per palette. That's half the price of the Z Palette Pro, and I got a ton of new shadows and blushes!

That's it! Happy organizing!

Sunday, February 26, 2012

How to ask for help

I'm learning to ask for help when I need it, but I learned something that goes much deeper than that. This month I was reminded that when people offer to help, you should give them something to do. 

from a student
The hardest part of being single and feeling helpless is the loss of autonomy. My instinct is turn down offers of help if I don't think I need it, mainly because I need to prove (to myself) that I'm still capable of taking care of myself. I also don't want to wear out the kindness of others and rely on them too much before I truly cannot take care of myself. What if I use up all my lifelines before my real time of need?

Why have I become so reluctant to call for help? Why am I so fiercely independent?

Once, as a little girl, I was playing a game of jumping back and forth from our mini-trampoline to a monster truck-sized inner-tube alone in the back yard. I'd alternate sitting, standing, and kneeling, back and forth from tube to trampoline, inventing new bouncing routines with glee. Inevitably, I misjudged a bounce or forgot that the earth wasn't elastic and landed with full force on my rear on the hard packed earth of our backyard. I felt like I had broken my tailbone and every backbone connected to it. I knew, like any smart child of a health care provider, that if you sustain a back injury you should NOT MOVE for fear of causing total paralysis. And so, for the first time in my life I yelled, "Help! Help me!"

I was stunned by the speed at which my father ran from his work in the nearby shop to my aid in the back yard. I was equally astonished at my ability to yell loud enough to attract his attention over the varied saws, grinders, and trip-hammers that were commonly heard from the shop. And thirdly, I was amazed at the genuine care and concern my generally stoic father displayed upon running to rescue his daughter from imminent demise. That is, until he saw that I was not actually in danger of imminent demise, something I wasn't yet convinced of. And then he yelled at me.

I couldn't believe it. I had experienced a physical jolt like none other in my young life and called for help, taking care to keep my precious spinal cord in a stable position. Help had arrived in the form of my big, strong father literally running to my aid, and then... I was being yelled at? What had I done wrong? "Don't you ever yell for help like that unless you actually need it!" he raged, and then stomped off. Hurt by his reaction, but reassured by his assessment that I was apparently in no danger of paralysis, I wiped away my tears and went inside to recover. For years, I was bothered by this conflicting scenario. If he had been a horrible father, would he have rushed to my aid? If he was a caring father, why had he yelled at me in anger? As I grew older I chalked this up to one of those situations in which you hear parents say, "He worried me half to death. I thought he'd been murdered! I could kill him for not telling us where he'd been all night!"

The only other time I've had to cry out publicly for help was after I'd clumsily attempted the Superman method of traversing stairs at the ski lodge. I remember thinking, "I should have unbuckled these ski boots, I hope I don't fall," and, "Wow! I'm flying! I'm really flying!" The next thing I remember was lying on my side, clutching my knee with both hands. That was when I knew something was definitely wrong. I remained still, closed my eyes, and appealed as loudly as I could, "Help! Someone please help me!" To my pleasant surprise, this time when I opened my eyes, I saw several faces peering down at me in response. It worked!

Cleo reminds me to rest
Recently, a coworker (who has asked not to be named) offered to help me get groceries while I'm stuck on the floor at home. I thanked her but declined, explaining that I was managing just fine on my own, and already had resources for what I couldn't do. She explained to me plainly yet profoundly that I need to let people help me. She told me of a time in which her family had been jobless and homeless due to natural disaster and she and her husband and small children had to learn to rely on the kindness of others.
"It felt odd and at first very uncomfortable to be on the receiving end of help. However, their different acts of kindness helped us appreciate the goodness in others and it gave us greater hope. 
I don't want to impose, but remember that I and others want to do any little bit so that you recover as quickly as possible because we care.  I'm sorry if this sounds so corny. So please don't see your list as a sign of dependence, see it as a simple way of me being a friend."
best epiphany ever!
This completely changed my mind about asking for and receiving help. And it reminded me of times that I have been able to help others, and how it made me feel useful. People know they can't take away your pain, but helping even in small ways makes them feel good.

So since then, I have kept a list of things I could use help with, and I'll pick something depending upon the sincerity of the offer, and the intimacy of our relationship. If someone really wants to help, he'll feel valued. If she was just bluffing to say something nice, she probably won't ask again. :)

Using white vinegar as a fabric softener

After reading a lot of blogs about DIY fabric softener, I decided to try just straight white vinegar. I don't need more scents and irritants, but it seems a lot of people add perfumes to the wash just because it makes the clothes smell "clean." 

you have to trust me on this one
So, I just filled my Downy ball with vinegar and threw it in with the wash. The clothes came out of the dryer soft and unscented. They do not smell like vinegar. This just elevated the joy of fresh, clean sheets to a new level of dreamy softness! And a bonus: the dryer ball is clean! 

I won't be buying fabric softener ever again!

Additional bonus: the vinegar worked beautifully to wipe off all the lint and detergent drippings to make my washer portrait-ready. 

Update: I'd recommend filling the Downy ball completely full, especially for a full load of towels and sheets. That's about one cup for those of you with other types of dispensers. For this load I experimented with only filling it to the line, and I wasn't as impressed as in previous trials.