 |
| Z Palette Pro |
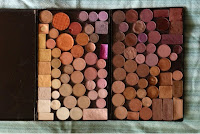
I first read about the Z Palette in a magazine at a doctor's office. I love the idea of consolidating all my loose shadows and compacts into organized, uniformly sized, space saving palettes! Unfortunately, I was unable to find any local retailers in the Portland area and the clerks at Sephora and Ulta had never heard of it. If any locals know of anyplace that carries it, I'd love to know. I just couldn't spend $20-28 a piece (or more, with shipping) on something sight unseen.
 |
| My Contour & Blush Palette |
One of the first things I learned during my medical leave was how to watch youtube videos. With a short attention span and laptop on the floor, I was finally a captive audience. So I watched every tutorial I could about DIY palettes and depotting shadows (I will not reinvent the wheel here with depotting instructions). I decided against using plastic CD or DVD cases, but had a hard time finding the right fit for me.
Eventually, I decided to purchase some 6x9" shadow and blush palettes from Coastal Scents and BH Cosmetics (they're identical and bigger than the empty palettes from Coastal Scents). Even if the powders are of questionable content from China, it seemed like a better bargain than buying empty palettes. It appeared possible to remove the shadows and plastic tray and replace them with a magnetic sticker, but the two helpful tutorials I found still left many questions unanswered, so I decided to write my very first tutorial:
How to magnetize and customize a Coastal Scents or BH Cosmetics palette
You will need:
pre-filled palette(s)
adhesive magnetic sheet(s)
knife
scissors
rubbing alcohol (the highest percent you can find)
heat embossing tool or hair dryer
baby wipes for clean-up
towels to protect your work surface
Additional optional supplies:
26mm metal tins and press pack from TKB Trading
3/4" adhesive craft magnets from Craft Supplies for Less
duck tape sheets for decorating available at Target, Jo-Ann's, etc.
The first thing you're going to do is poke through the flimsy plastic tray the tins are glued to. Use the knife to cut all around the perimeter of the palette and separate each shadow. Be careful not to nick or break your pressed powders, but if you do, you can re-press them later with the rubbing alcohol and a baby wipe. You can then use your scissors to trim around the shadows. This will give you openings to pour the rubbing alcohol into.
The tins are glued in two places, first into the plastic tray and then under each shadow to the palette below. The glue is strong, and if you try to just pry them out, you will break all your powders. Instead, pour rubbing alcohol into one of your openings and let it sit while you repeat the first step on your next palette. You may need to keep adding alcohol as it evaporates and tilt the tray to get to each spot of glue. If you're impatient for the glue to turn to goo, use a quick shot from your heat tool. Be careful not to warp the bottom of the palette!
After you've let it soak, use your knife or sturdy prying tool (I switched to a letter opener) to begin gently poking under the edges of the shadows. Some of them come out easily, and others become a yucky mess. It just depends on how much glue there is. Don't force it. Add more alcohol and keep prodding until you can pull out the shadow, the plastic tray, or bits of both. I will confess that the palettes I used for this tutorial took a lot longer to clean out than any of the palettes I had previously done. This is a great opportunity to listen to an audio book or podcast (I listened to one on C.S. Lewis).
 |
| broken shadows can be fixed! |
When you have finally liberated the tins from the palette and as much as the plastic tray that comes with them, use your knife to scrape off all remaining plastic bits. It doesn't matter how scratched up the palette gets, but you don't want anything left in there that will cause bumps under your adhesive magnet. Use baby wipes and copious amounts of rubbing alcohol to clean all traces of glue from the palette and the bottoms of the shadows.
Next (or while you are waiting for the glue to dissolve) use the clear plastic protector that came in the palette to trace out the shape of your magnet. I cut mine just a little bit smaller, and angled off the corners for a better fit. I purchased 9x12 sheets from Craft Supplies for Less. Each sheet will magnetize two palettes, with a bit left to stick to tins. I'm going to try another magnet from Jo-Ann's, I'll let you know how they compare.
When you are certain that the palette is clean and ready, it's time to stick in the magnet, smoothing as you go to avoid air bubbles.
Voila! You now have a custom magnetic palette. Steel tins will stick without any further preparation. You can super-glue thin magnets to the bottom of aluminum tins, or cut a thin piece of metal (I had some leftover from magnetizing e.l.f. palettes). Use a sharpie to label shadows you want to remember the name/brand of.
I did the math and found that although this method takes a lot of time, I spent $14 in materials per palette. That's half the price of the Z Palette Pro, and I got a ton of new shadows and blushes!
That's it! Happy organizing!


No comments:
Post a Comment